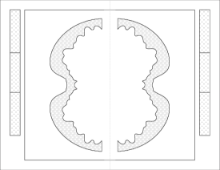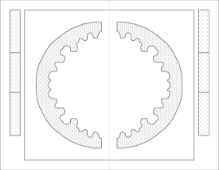

This activity features one of the most famous supernova remnants called Tycho, named after a Danish astronomer who spotted the explosion hundreds of years ago.
Cost: About $0.50 (50 cents) per item
Time: 20-30 minutes to
Age: 11+
Materials:
• paper
• a black and white printer
• scissors
• tape or glue
• good background music
• Coin Batteries ($0.30 each)
DOWNLOADS
PDF AND TEMPLATE
Make your own snowflake chain using real 3D information!
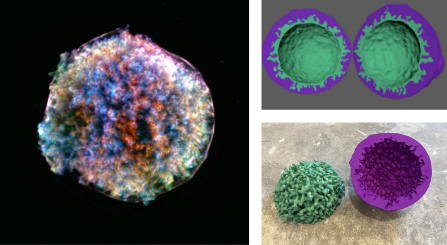
The Science: Stellar Evolution and Exploded Stars
Stars are born, live for a period of time, and die. Some of them – the very biggest – end their lives in dramatic explosions called “supernovas.” These supernova explosions leave behind intricate glowing debris fields (known as supernova remnants) that contain the elements necessary for life. Every supernova remnant is unique. Like snowflakes, they seem similar at first glance, but are exquisitely varied as we explore them in detail.
As with many supernova remnants, Tycho glows brightly in X-ray light because shock waves generated by the stellar explosion heat the stellar debris up to millions of degrees. Supernovas sprinkle elements such as iron and silicon, which are essential for life, into the next generation of stars and planets.
Directions:
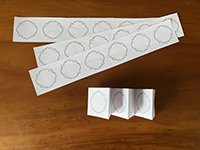
Directions: Print the first page with the strip showing the outline of one supernova at the end.
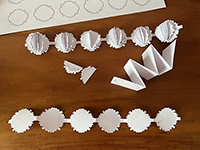
1. Fold into sixths, using the dotted lines as a guide, accordion-style, so that the outline of the supernova shows on the outside.
2. Cut through the 6 layers of paper, along both solid lines making a curvy outline of a supernova with a connecting strip through the center, your connected chain.
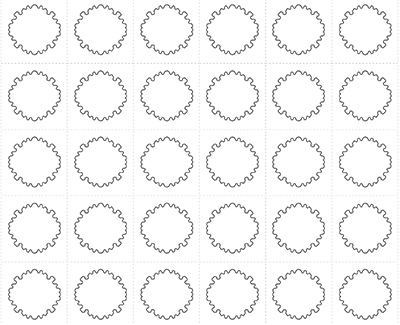
3. Print the other 2 pages, each showing a grid of 6 x 5 supernova outlines.
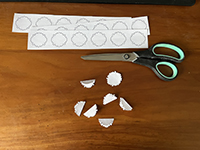
4. Cut out all 60 supernova outlines from p. 2 & p. 3. This goes fastest if you cut into strips and accordion fold each strip, cutting out 6 at a time.
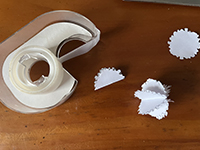
5. Fold each separate supernova circle in half.
6. Using glue or scotch tape, affix 5 of the folded circles together to look like the pages of a book laying open on a desk.
7. Using one of the circles in your connected chain as the “book cover” affix a 5-piece folded structure to it.
8. Repeat steps 5-6 for each circle in your connected chain.
9. Flip the chain over and repeat steps 5-6 for the back side of the chain.
WATCH THE VIDEO DIRECTIONS

Create a festive and spacey paper chain with the Chandra X-ray Observatory, NASA’s premier X-ray telescope that brings us data from supernova explosions and many other high-energy cosmic phenomena.
Cost: About $0.50 (50 cents) per item
Time: 5-10 minutes to complete.
Age: 8+
Materials:
• paper
• a black and white printer
• scissors
• tape or glue
• good background music
DOWNLOADS
PDF AND TEMPLATE
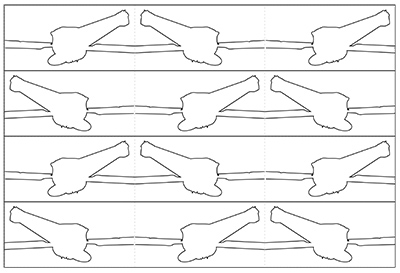
Make a festive and spacey chain
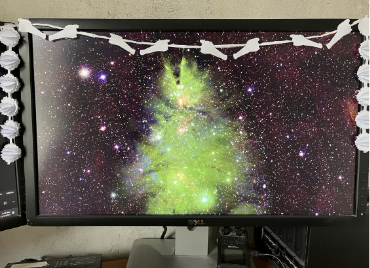
Directions:
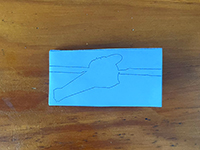
1. Print one page of connected Chandra spacecraft outlines.
2. Cut out straight solid lines to make 4 strips of 3 spacecraft each.
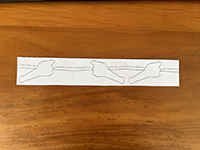
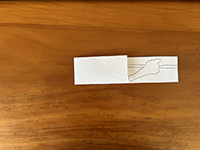
3. For each strip, printed side up, fold one third over to meet the dotted line.
4. Flip over and fold again so that you’re left with an accordion-style fold.
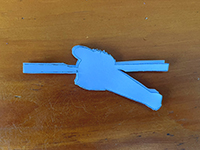
5. Cut the shape of the spacecraft out and unfold to show 3 linked shapes.
6. Repeat for each strip.
7. Tape together for a longer chain of 12.
8. Print more pages and repeat to make your chain as long as you like.
9. Hang along with your Tycho paper chain on a tree or around the office or anywhere needing an extra festive touch.
10. Feel free to bedazzle your chain with glitter, colored markers, stickers or other craft supplies.
WATCH THE VIDEO DIRECTIONS

A hands-on activity using printable templates and creating simple paper circuits. Good for MakerFaires, libraries, classrooms and other STEM related events where participants can create their own take-away.
Cost: About $0.50 (50 cents) per item, estimates are provided in the materials list
Time: about 5 minutes to make a single item
Age: approximately ages 9 & up (not for very young children/battery is a choking hazard)
Materials:
• Coin Batteries ($0.30 each)
• Copper tape with conductive adhesive ($0.10) - Less than 12 inches per badge
• LED’s ($0.05)
• Small binder clips ($0.05)
• NASA Images of exploding stars/pulsars/neutron stars (PDF linked below)
• Hand held hole punchers
• Small trash can – little bits of trash are produced during the activity
DOWNLOADS
Instructions #1 and #2
Cards #1
Cards #2
Instructions #3
Card #3
Paper Circuits: Light Up Exploded Stars
What is a Paper Circuit?
Paper circuits help learners of all ages explore the basics of electricity (energy that results from the existence of charged particles like electrons or protons) and conductivity (the degree to which a material can conduct electricity). Paper circuits function as simple low-voltage electronic circuits (a path through which electrons from a voltage or current source flow) made using paper, LED lights, a type of conductive tape such as copper, as well as a small battery for the power source.
Directions:
First, download the instructions: PDF
Then, download the pdf below and print any of the images double-sided (so the shapes are lined up) and cut in half (you will get two handouts per page)
Light Up Exploded Stars (PDF)
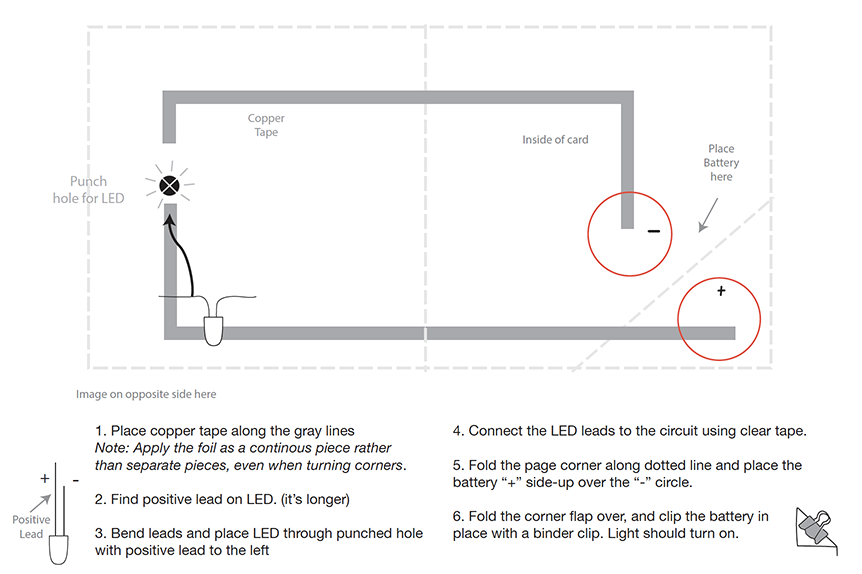
1. Have participants cut out the rectangle - see handout for instructions
2. Ask participants to fold paper in half on the dashed line so that the directions are on the INSIDE/images are on the OUTSIDE.
3. Punch a hole for the LED light - see template
4. Following the remaining steps outlined on the handout - placing copper tape, finding the positive lead on the LED and affixing the leads to the circuit, and folding over with the coin battery.
5. Use a binder clip to hold battery in place on the circuit (so the light stays on)
Troubleshooting
Make sure that the positive end of the LED is matching up with the positive end of the battery and that the copper tape is touching the battery. If something isn't working try the following:
• Flip the battery over. If the LED was put in backwards, it just means the positive and negative parts of the circuit are reversed.
• Check all connections - around the LED leads, alignment with the battery, any broken places in the copper tape. Use more tape to reinforce connection.
• Sometimes an LED might not be working correctly so try another one. Once in a while a battery fresh out of the package can also be dead, so try a 2nd battery if all else fails.

Finished Product Examples:
Cas A
Constellation
Paper Circuits: Light Up Constellation
The Science: Constellations
"Constellation" is the name we give to seeming patterns of stars in the night sky. “Stella” is the Latin word for star and a constellation is a grouping of stars. In general, the stars in these groups are not actually close to each other in space, they just appear to be close when viewed from Earth.
If we could travel by spaceship to another part of the galaxy, we would imagine an entirely different set of constellations. In the meantime, for us on Earth, the constellations are a handy way to locate a star in the sky.
On Earth, we see different constellations as we travel to different parts of the globe. The fact that some constellations were visible in the northern hemisphere and not the southern hemisphere, and vice-versa, was used more than 2000 years ago by Greek astronomers to argue that the Earth is round.
The stories associated with the constellations come from many cultures and most exist in several variations. The purpose of this section is to give an overview of the main legends behind a few constellations that mark those parts of the sky in which the NASA images in this activity are located. While we give more details from the story associated with the official name of the constellation (as adopted by the International Astronomical Union), we also mention other legends and stories connected with a particular pattern. However, there are so many stories, from so many cultures, and so many variations on even well-known stories, that only a brief summary is presented here. Continue your own reading about the constellations by searching for other stories online or at your local library.
In the Light Up Constellations activity, participants can find and trace some select constellations and light them up with the paper circuits, or they can create constellations and background stories of their own. Enjoy!
What is a Paper Circuit?
Paper circuits help learners of all ages explore the basics of electricity (energy that results from the existence of charged particles like electrons or protons) and conductivity (the degree to which a material can conduct electricity). Paper circuits function as simple low-voltage electronic circuits (a path through which electrons from a voltage or current source flow) made using paper, LED lights, a type of conductive tape such as copper, as well as a small battery for the power source.
Directions:
First, download the instructions: PDF
Then, download the pdf below and print any of the images double-sided (so the shapes are lined up) and cut in half (you will get two handouts per page)
Light Up Constellations (PDF)
1. Have participants cut out the rectangle - see handout for instructions
2. Ask participants to fold paper in half on the dashed line so that the directions are on the INSIDE/images are on the OUTSIDE.
3. Punch a hole for the LED light - see template
4. Following the remaining steps outlined on the handout - placing copper tape, finding the positive lead on the LED and affixing the leads to the circuit, and folding over with the coin battery.
5. Use a binder clip to hold battery in place on the circuit (so the light stays on)
Troubleshooting
Make sure that the positive end of the LED is matching up with the positive end of the battery and that the copper tape is touching the battery. If something isn't working try the following:
• Flip the battery over. If the LED was put in backwards, it just means the positive and negative parts of the circuit are reversed.
• Check all connections - around the LED leads, alignment with the battery, any broken places in the copper tape. Use more tape to reinforce connection.
• Sometimes an LED might not be working correctly so try another one. Once in a while a battery fresh out of the package can also be dead, so try a 2nd battery if all else fails.
Paper Circuits: Black Hole Edition
The Science: Black Holes
A black hole is a dense, compact object whose gravitational pull is so strong that - within a certain distance of it - nothing can escape, not even light. These bizarre objects are found across the Universe -- within double star systems and at the centers of galaxies where giant black holes grow. X-ray telescopes like NASA’s Chandra X-ray Observatory can see superheated matter that is swirling toward the event horizon of a black hole, and help reveal how black holes impact their environments, how they
behave, and their role in helping shape the evolution of the cosmos.
In 2019, the Event Horizon Telescope (EHT), a network of radio antennae around the globe, captured the first image of a black hole’s shadow. The black hole is located in the galaxy Messier 87, or M87, which is about 60 million light years from Earth. Many other telescopes have studied the M87 system and will continue to investigate the intriguing mysteries of black holes.
What is a Paper Circuit?
Paper circuits help learners of all ages explore the basics of
electricity (energy that results from the existence of charged particles
like electrons or protons) and conductivity (the degree to which a
material can conduct electricity). Paper circuits function as simple
low-voltage electronic circuits (a path through which electrons from a
voltage or current source flow) made using paper, LED lights, a type
of conductive tape such as copper, as well as a small battery for the
power source.
Directions:
First, download the instructions: PDF
Then, download the pdf below and print double-sided (so the shapes are lined up) and cut in half (you will get two handouts per page)
Black Hole Edition (PDF)
1. Have participants cut out the rectangle - see handout for instructions
2. Ask participants to fold paper in half on the dashed line so that the directions are on the INSIDE/images are on the OUTSIDE.
3. Punch a hole for the LED light - see template
4. Following the remaining steps outlined on the handout - placing copper tape, finding the positive lead on the LED and affixing the leads to the circuit, and folding over with the coin battery.
5. Use a binder clip to hold battery in place on the circuit (so the light stays on)
Troubleshooting
• Flip the battery over. If the LED was put in backwards, it just means the positive and negative parts of the circuit are reversed
• Check all connections - around the LED leads, alignment with the battery, any broken places in the copper tape. Use more tape to reinforce connection.

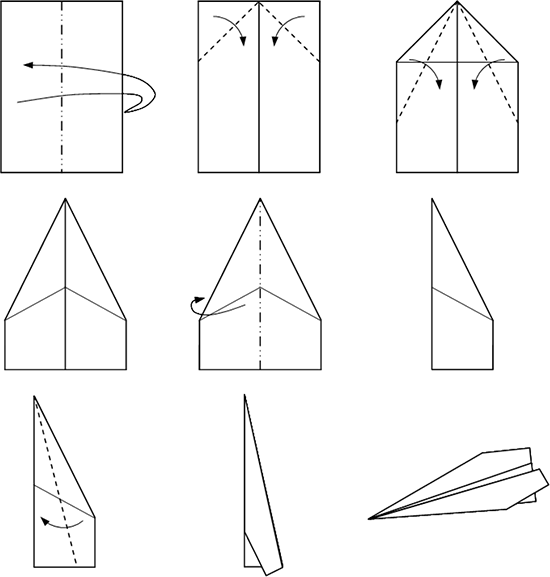
TIPS FOR MAKING YOUR BEST PAPER AIRPLANE
Test how far your airplane flies using the same distance markers every time. Each time you launch your plane, try to throw it with the same amount of “oomph” (a nontechnical term for “force”).
DOWNLOAD PDF
Fly into Space: The Science of Flying
While kids might like to make paper airplanes, it’s much more than child’s play. There is a lot of science and engineering that goes into making a successful paper airplane. For example, you need to know about what forces – that is, pushes and pulls – act on your airplane. When you push a paper airplane forward (or any airplane for that matter), this is a type of force known as thrust. Meanwhile, air is pushing back on the plane, which is called drag. While a plane is flying, air moving over and under the wings pushing it upward, while the gravity from the Earth pulls it down. All of these forces (thrust, lift, drag and gravity) affect how well a given paper plane's flight will go.There are other factors that determine how far and high your paper airplane will go: its construction material (type of paper), angle of lift off (how you push it off), and even the atmospheric conditions (the weather). Experiment with these different aspects of flying a paper airplane, and most importantly, have fun!

Make paper airplanes that are different sizes and compare how well they fly. Do bigger planes fly farther or not?
Try making paper planes out of different types of paper, such as printer paper, construction paper and newspaper. What happens?
Come up with your own designs and find out what results you get!
Please note: Be safe, never throw your paper plane at a person or animal
The Universe in Motion: DIY Flipbooks
A flip book is a small book with a series of pictures that changes gradually from one page to the next. When you flip all the pages of a flip book, the images look like they're moving or being animated.
How does a flip book relate to the Universe? It can be a fun do-it-yourself technique to show objects in our Universe changing over time. Our Universe is constantly changing, moving, evolving as a dynamic place. The scale or pace of those changes, however, can be quite different from human timescales. Stars, for example, can evolve over millions and billions of years. The fate of a star, however, depends on its mass. Massive stars, many times more massive than our Sun, can blow up in a cataclysmic explosion called a supernova. Try our Universe of Learning Stellar Evolution flipbook here.
Supernova 1987a
One such supernova, Supernova 1987A (or SN 1987A) is a star that exploded in the Large Magellanic Cloud first seen by observers on Earth from the southern hemisphere on February 24, 1987. It was the nearest supernova explosion seen in modern times and provides astronomers the best opportunity ever to study the phases before, during, and after the death of a star. The close-up images of SN 1987A on the following pages of the flip book show X-rays from NASA’s Chandra X-ray Observatory.
From 1999 until 2013, Chandra data showed an expanding ring of X-ray emission that had been steadily getting brighter. This was produced by the blast wave from the original explosion that had been bursting through and heating the ring of gas surrounding the supernova. In the past few years, there have been striking changes in the data. This provides evidence that the explosion’s blast wave has moved beyond the ring into a region with less dense gas. This represents the end of an era for SN 1987A. Since astronomers do not know exactly lies beyond the ring, they will be watching carefully what happens next.
Chandra X-ray Time-lapse movie of SN 1987A
To create your own supernova in a flip book, print out the pages from the downloadable PDF. (We've provided full color and printer ink-friendly inverted/black and white versions of the PDF.) Glue the pages to card stock for a sturdier flip book, if desired. Cut out each page along the dotted lines. Stack the pages in order, by number (1-20). Clip the pages on the left hand side with a mini binder clip, clothespin, potato chip bag clip, or with staples. Then flip through your pages to see SN87a change over time.
SN 1987A Flipbook
Design Your Own
To design your own flip book, you can cut out similarly sized pieces of paper (or use a sticky note pad), and draw an object of your choice changing a small amount across each piece of paper. For example, you could draw a rocket ship blasting off the Earth, or an astronaut jumping on the Moon. Be careful to line the drawings up at the same spot on each page to see the motion. Then stack your papers, clip your drawings together, and flip through them to see the object in motion.
Make Your Own Zine
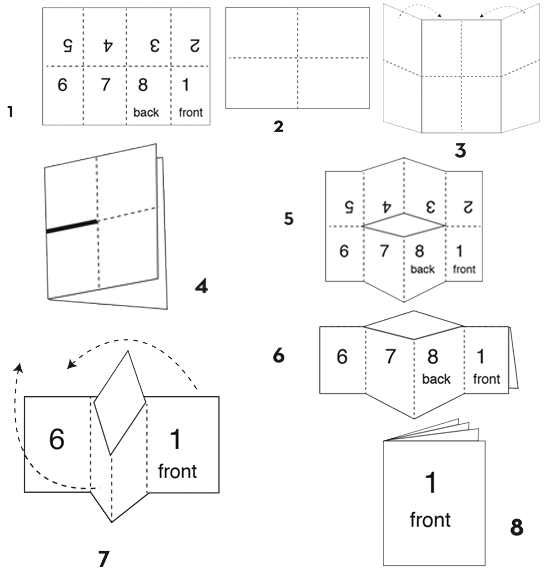
A zine (think of it as shortened from "magazine") is a small, free, self-published folded print that is usually photocopied and handed out in small batches. Zines can be about any topic and are creative ways to dive into something that interests you, from art to science fiction to social justice to poetry. They are meant to be do-it-yourself, hand-made, and shared with others, great for those who like to cut, fold, paste, decorate, stamp, and more.

Included here are two example zines, as well as directions on how to print and fold them. The first sample zine is about women in STEM (more information here), and the second is about NASA's Chandra X-ray Observatory (more information here). But truly, the sky's the limit, so try making your own zine about a topic that you care about using the template provided.
Directions:
1. Print one of the example pdfs provided.
Sample Zine #1: Women in STEM
Sample Zine #2: NASA's Chandra X-ray Observatory
2. Crease the sheet along the two main directions (by folding it in half then opening it, once for each direction).
3. Now make another pair of creases, dividing the long direction into quarters.
4. Then unfold again, fold in half, and make a cut with scissors as shown - you should be cutting through two thicknesses of paper, but only as far as those quarter-folds you just made.
5. Open it out again. The resulting page should have a cut in its center.
6. Fold it in half along the long direction, so that all your pages are still on the outside.
7. Now push it inwards from each end, so that the inner bit pushes out in both directions to make a kind of cross-shape.
8. Fold the resulting pages together so that your front page is outermost.
And there you have it, a little zine of 8 pages that needs no stapling or gluing!
Making your own zine
3D Paper Models
PROJECTS:
360° Paper Models
360° Paper Book
Spacecraft Paper Model
Cost: Under $5
Time: 2-4 hours
Materials:
• 6 pieces of 8 1/2 x 11 paper printer
• scissors
• glue
• 2 pieces of heavier paper or cardboard for a cover (could even use a cereal box)
• optional materials - anything for decorating the cover - glue/glitter/yarn/markers/crayons/etc.
DOWNLOAD HANDOUT & INFO
DOWNLOAD TEMPLATE
PDF V745-SCO
DOWNLOAD TEMPLATE
PDF TYCHO
VIDEO
360° Paper Models
A hands-on activity using printable templates and fine motor skills to create books that open up to reveal 360-degree 3D models of a nova or supernova.
V745-SCO Nova and Tycho

V745-Sco
For decades, astronomers have known about irregular outbursts from V745 Sco, which is located about 25,000 light years from Earth. V745 Sco is a binary star system that consists of a red giant star and a white dwarf locked together by gravity. These two stellar objects orbit so closely around one another that the outer layers of the red giant are pulled away by the intense gravitational force of the white dwarf.

Tycho
In 1572, Danish astronomer
Tycho Brahe was among those who noticed a new bright object in the constellation Cassiopeia. Astronomers now know that Tycho’s new star was not new at all. Rather it signaled the death of a star in a supernova, an explosion so bright that it can outshine the light from an entire galaxy.
In this activity, you can make your own V745-Sco or Tycho out of paper.
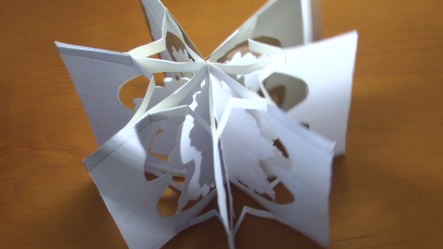
Directions: Download the pdf instructions with templates.
Step 1: Print 6 copies of Template on 8 ½ x 11 paper
Step 2: Fold in half along the dotted line. Fold in half again so that the paper is in quarters.
Step 3: Cut along the outer square border to trim the outer edge away.
Step 4: Cut along the 2 curves to separate the ejecta from the shockwave. Cutting this way with the paper folded in quarters will result in symmetry along both the X & Y axis and you will end up with a central “ejecta” region on solid paper with a surrounding “shockwave” of negative space (patterned area on the template).
Step 5: Repeat steps 2-4 for the remaining 5 print-outs.
Step 6: Keep all 6 cut-out pages folded in half only, like a greeting card. Line up 2 of the pages so that the folded edges abut. Cover the face-up surface of both pages with glue (spray adhesive or glue sticks work well) and stick the pages together. Lift and make sure there are 2 free sides on either side of the glued-together sides.
Step 7: Repeat step 7 until all pages are connected.
Step 8: Attach paper hinges as shown on video.
Cost: Under $2
Time: 30 minutes
Materials:
• 4 sheets of paper
• pencil
• ruler or straight edge
• jar lid or something round
• scissors
• tape
360° Supernova Paper Book
360-degree books can help learners understand the three dimensionality of phenomena often shown as 2D images. The science of stellar evolution and supernova explosions can launch students into this fun, hands-on craft, which can be modified for varying levels of complexity. Math concepts involving angles can be incorporated while allowing students to use their creativity as engineers (try using more pages and figuring out the changes in length of the hinges using the Pythagorean theorem) and as artists (try decorating finished books with colored pencils, stickers, beads, and other crafts or artwork to help make them more interesting while also providing information about the phenomena that created this amazing object).
Learn more about 3D models of exploded stars such as Cassiopeia A, Tycho's Supernova Remnant, or SN1006
Spacecraft Paper Model
NASA Great Observatories Paper Models
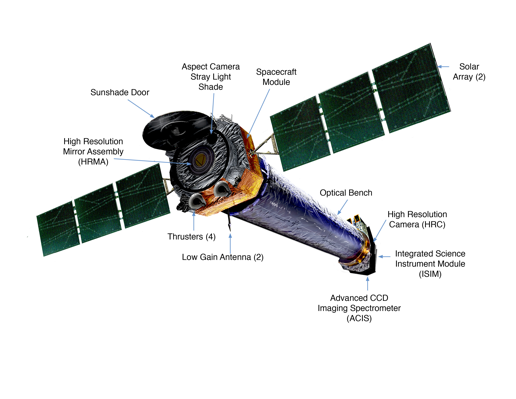
Learn more about some of NASA's eyes in the sky by constructing your own paper models in this publication of "NASA's Great Observatories." The Chandra X-ray Observatory, the Hubble Space Telescope and the now-retired Compton Gamma Ray Observatory are all included in the paper model instructions (suitable for grades 5 and up).
Printable fun pad of activities
This printable activity pad in PDF form will take you on a journey into space flight (with paper airplanes) and how we talk to our telescopes in space (see binary code and binary beats). Meet a couple of astronauts (in coloring pages and zines), and then learn about exploded stars (through paper circuits, origami and a coloring page). Print out the pages of your choice!
TABLE OF CONTENTS
How to Talk to a Space Craft: Binary Code 1-2
Launching into Space: Science of Flying 3-4
Coloring Page: Astronaut Cady Coleman 5
Coloring Page: Astronaut Mae Jemison 6
Origami a Japanese Style of Paper Folding 7-8
Coloring Page: Supernova Cassiopeia A 9
Light Up Exploded Stars 10-11
Binary Beats 12-13
Women in Stem Zine 14
Putting Together Your Zine 15
Published: December 2018


