Universe in 3D
modeling and printing cosmic objects
INTRODUCTION
Over the past decade, 3D modeling and 3D printing in science has blossomed while commercial 3D printers have become more common.
3D printing is an additive process where an object is built up layer by layer. Applications range from creating personalized assistive devices and prosthetics, to 3D printing with bioinks (such as blood or other cells) to 3D printing of earthquake visualizations (using USGS data to compare Californian earthquakes).
3D modeling offers a new tool to represent and understand scientific data, particularly when we can create and manipulate models to gain new perspectives on the data being explored. But 3D modeling in astronomy can be challenging. Scientists are generally not able to fly a spacecraft out to the cosmic objects that we want to study in 3D. So astronomers have to be innovative and creative while using a wide range of tools and techniques.
One of those tools is NASA’s Chandra X-ray Observatory. Launched into space aboard the Space Shuttle in 1999, Chandra travels around the Earth in an elliptical orbit where it can detect X-rays from space. X-rays reveal unique information on such things as colliding galaxies, merging black holes, and stellar nurseries as well as the mysteries of dark matter and dark energy.
When scientists combine data from Chandra with other telescopes, such as the Hubble or Spitzer Space Telescopes, or with scientific and mathematical models, we can create data-driven 3D maps of objects in our Universe, such as stars that have exploded.
This activity series will take you through the basics of 3D modeling in astronomy using the free browser-based software Tinkercad. Participants can start with a video tutorial on simple shapes such as disks and spheres before moving on to more complex shapes and systems. Next, users can work with actual NASA data on exploded stars, and load the files into augmented reality. Finally, there are two codeblock exercises incorporating exploding stars that demonstrate loops and changes over time. The results of the 3D models in this activity module can be saved to each participant's account and then sent to a 3D printer of your choice to be produced.
For detailed background on 3D modeling and printing in astronomy, please read "How to hold a dead star in your hand".
Let us know what you think about this activity, take a short survey!
BEGINNING STEPS: DISKS & SPHERES
Start with the Tinkercad tutorial video:
General Tips:
. Create a username and password in order to log in: https://www.tinkercad.com/
. Freely move shapes along the work plane: use the top handle to change the height of the shape. Use the corner angles to change the size. Use the arrows to rotate the shape.
. Move the shape up and down by moving the arrow handle on top of the shape.
. Select multiple shapes by holding the shift key down and selecting multiple shapes.
. Press and hold the shift key while scaling and it will keep the same size ratio.
. Use copy and paste to duplicate your shapes.
. When finished with your shapes, clicking on Tinkercad logo in upper left corner automatically saves your file and returns to 'My Recent Designs' screen.
. On your My Recent Designs, you can "Change properties" to make your file private or public, name it.
. Use 'Export' in the upper right corner to download your file for 3D-printing or laser-cutting.
. You can move around and change your view in the build area by clicking around the orientation cube in the upper left corner and other menu buttons underneath it, or by clicking on the middle or right mouse button and dragging around (middle button tracks, middle wheel zooms, right button tumbles).
TRYING IT OUT
Create an accretion disk
2. Click "Create New Design" button.
3. Move around your grid until you're at the top down perspective.
4. On the right menu, under Basic Shapes, select 'Torus' and click anywhere on grid.
5. Using the shift key to keep the torus in the original ratio, size the torus to be about 1/2 of your grid size or slightly larger.
6. Change perspective until you are viewing your torus from the side. Using the white box at the top of the torus, shrink your shape down until it's only a few mm thick.
7. Experiment with aligning your torus to the middle of your grid.
8. With your new shape selected, the 'Shape' panel appears in the upper right corner. Click on 'Solid' to see color options. Select color and grab a red or orange tone.
9. Click on Tinkercad logo in upper left corner to save and close your file. Once returned to 'My Recent Designs' screen, hovering over the new design, click the gear icon and select 'Properties' to rename your file to be 'Accretion Disk 1.
Create an Earth-Moon system
2. Click "Create New Design" button.
3. Move around your grid until you're at the side perspective.
4. On the right menu, under Basic Shapes, select 'Sphere' and click anywhere on grid.
5. Using the shift key to keep the sphere in the original ratio, size the sphere to be about 1/3 of your grid size.
6. Using the white box at the top of the sphere, and still holding the shift key, size your shape until it's about 80 mm thick.
7. Experiment with aligning your sphere to the middle of your grid.
8. Select color (upper right) and grab a mid or dark blue tone.
9. On the right menu, under Basic Shapes, click a second "Sphere"
10. Using the shift key to keep the sphere in the original ratio, size the sphere to be about 1/4 of your first blue sphere's size.
11. Experiment with position and color of 2nd sphere.
12. Click on the Tinkercad logo in upper left corner to save and close your file. Once returned to 'My Recent Designs' screen, hovering over the new design, click the gear icon and select 'Properties' to rename your file to be 'Earth-Moon System'.

NEXT STEPS: COMPLEX OBJECTS
Create a Proto Chicken in Space
2. Click "Create New Design" button.
3. Move around your grid until you're at the corner perspective.
Feet
4. On the right menu, under Characters, select 'Chick Foot' and click anywhere on grid.
5. Using the rotate arrow to turn the foot pointing outward slightly, perhaps 22.5 degrees.
6. Copy and paste to place a 2nd foot, about 6 mm away from your first. Using the rotate arrow to turn the foot pointing about 45 degrees the opposite way of the first.
Body
7. On the right menu, under Characters, select 'Egg' and click anywhere on grid.
8. Using the shift key to keep the egg in the original ratio, size the egg to be about 50 or 60 mm tall.
9. Using the rotate arrow on the egg, rotate your shape 90 degrees to form the body.
10. Experiment with aligning your egg body to the feet on your grid.
11. Grab any color for your chicken body.
Head
12. On the right menu, under Characters, click a second "Egg" to make your chicken head.
13. Using the shift key to keep the head in the original ratio, size the egg to be about 30 mm.
14. Use your perspectives and arrow keys to place the second egg about half way into the top of the first egg to create your chicken head. This might take a few shifts of perspective and alignment to get your chicken head into approximate position.
15. Select color (upper right) and grab a matching tone to your chicken body.
Beak
16. On the right menu, under Basic Shapes, select a "Pyramid" to make your chicken beak.
17. Size it to be approximately 7-10mm.
18. Rotate it and place on your chicken head.
Eyes
19. On the right menu, under Basic Shapes, click a "Sphere" to make your first chicken eye.
20. Size it to be approximately 5-10mm.
21. Place it next to your chicken beak on the head.
22. Select color (upper right) and grab a dark or black tone, for example.
23. Copy and paste the eye to create a second eye.
24. Place it on the opposite side of your chicken beak on the head.
25. Make sure your pieces are all attached to your chicken.
26. If desired, you could experiment with adding wings or a mouth etc to your proto-chicken.
27. Close and save your file. Using the properties button, rename your file to be Proto Chicken in Space.
Freeform: Create a Celestial Object of your Choice
2. Create New Design
3. Consider what kind of object you would like to create:
. a planet with rings
. a nebula
. a cluster of stars
. an exploded star
. something else
4. Experiment with the built in shape options in Tinkercad
For example, for a Saturn-like planet you could select a sphere and then the ring object. Adjust the rings to be flat and very thin, with plenty of room between them and the host planet. Pay attention to where the rings lay in respect to their host planet. Practice adding multiple sets of rings for a more complex object. Or, tilt the rings like Uranus's rings are tilted by 98 degrees.
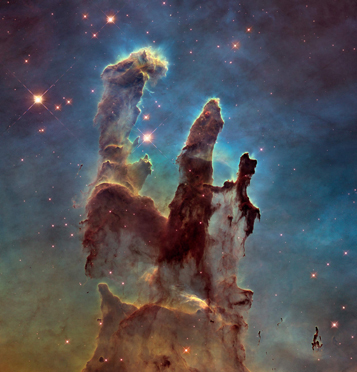
For objects other than planets, research what components might be useful to create in order to build them in a 3D space. For a nebula, what might the Eagle Nebula (shown at upper right) need to be built from to get the tall, thin, clumpy towers? Experiment with more complex shapes until you are satisfied with your object.
5. Combine shapes by shift-selecting multiple shapes that are intersecting and clicking on "Group" in the upper right or Control + G.
If you choose to make one of your objects a "hole" and intersect it with another object that is a "solid" (both selections in the shape menu, shown when object is selected), and then group the two objects, the hole shape will take a bite out of the solid shape. This is a fun way to create new organic shapes from basic shapes.
6. When satisfied with your freeform object, be sure to close and save your file. Using the properties button, rename your file.
WORK WITH 3D NASA DATA: SUPERNOVAS & PULSARS
Working with NASA 3D Data, Part 1: Crab Pulsar
1. Before starting, go to the website shown and download the following file: Crab_Xray_Data.stl. This file shows the X-ray data of the Crab Pulsar.
3. Create New Design.
4. In the upper, right-hand corner, click Import.
5. Select the previously downloaded file Crab_Xray_Data.stl and click Import. Allow several seconds for Tinkercad to import the file.
6. Using the Shift Key to keep the pulsar in the original ratio, size the object to be slightly smaller than the grid.
7. Select a color for the pulsar.
8. Under Basic Shapes, select TEXT, and drag text block onto your grid.
9. Position the text near the ring.
10. Change this label to “Ring”.
11. You can change the font and other settings.
12. Copy and Paste (Control-C & Control-V) to add labels to Jets and Pulsar.
13. You can change the transparency of objects to better view the labels.
Working with NASA 3D Data, Part 2: Supernova 1987A
1. Before starting, go to the website shown and download the following files: Ring.stl and RingDebris.stl. These files are the scientific data of Supernova 1987a (SN 1987a) broken into two components, as it is seen in 2017. (The third file on this link, RingDebris_2000.stl, shows the ring debris from Supernova 1987A as it looked in the year 2000.
3. Create New Design.
4. In the upper, right-hand corner, click Import.
5. Select the previously downloaded file Ring.stl and click Import. Allow several seconds for Tinkercad to import the file.
6. Using the Shift Key to keep the ring in the original ratio, size the object to be slightly smaller than the grid.
7. Select a color for the ring.
8. Once again, click Import.
9. Select the previously downloaded file RingDebris.stl and click Import. This larger, more complex file will take longer to import.
10. Scroll with the middle mouse button, or click the Minus icon on the left sidebar to zoom in or out.
11. Using the Shift Key to keep the object in the original ratio, size the ring debris to be roughly the same diameter as the ring. This may take several view changes.
12. Select a contrasting color for the ring debris.
13. Select the ring and drag or use arrows to move the ring to the center of the ring debris.
14. Make final scale and position adjustments to fit the ring and the ring debris together. This might take a few shifts of perspective and alignment.
15. In the upper, right-hand corner, click Export.
16. Select "Everything in the Design" and click the STL file extension, a format widely-accepted by 3D printers.
17. Choose a folder on your computer, and name and save your printable file.
18. Click Tinkercad logo, and Tinkercad automatically saves your work.
19. Hover over your new design, click the gear icon, and choose Properties.
20. Rename your Tinkercad design "SN1987a in 2017".
21. If you are working on a newer-model iPad, you can access your file in Augmented Reality. In the upper right-hand corner, click AR-Viewer, and wait.
22. Follow the on-screen prompts to place the object in real space.
23. You can manipulate the object in its new environment and walk around.
CODING THE STARS: TINKERCAD CODEBLOCKS
Coding with Codeblocks: Supernova Explosions - Part 1: Create an Animated Explosion
This lesson introduces coding using TinkerCAD Codeblocks to change properties of 3D objects over time and create a simple animation of a supernova explosion.
2. Click CODEBLOCKS and Create New Codeblock.
3. Select New Design.
4. Under Shapes, drag the Add Sphere block onto your stage.
5. Hit the Play button to see the result.
6.Toggle the properties arrow and set the radius to 200. Hit Play again.
7. Change your perspective to get a bird’s-eye view.
8. Under Modify, choose the Scale block.
9. Change each dimension to 0.5 and hit Play.
10. Choose the Set Color block and change the sphere’s color to white, then hit Play.
11. Select another Scale block and set each dimension to Zero, then hit Play.
12. Under Shapes, select and drag an Add Torus block and choose a color, then hit Play.
13. Choose a Scale block and set dimensions to 20, then hit Play.
14. Under Control, select a Repeat block and place it onto the last Scale block. Set repeat to 3 and hit Play.
15. Change Scale dimensions to 5 and hit Play.
16. Rename your file “Supernova Explodes”.
17. Click Share, and Animated GIF, and TinkerCAD creates a movie.
18. Choose a location and save your file.
19. Change the perspective and create a second animated gif.
20. Click the TinkerCAD icon to save your work.
Coding with Codeblocks: Supernova Explosions - Part 2: Use Loops to Build a Supernova Remnant
This lesson explores repeating code using TinkerCAD Codeblocks to create a simple rotated shape representing the remains of an exploded star.
2. Under CODEBLOCKS, Create New Codeblock.
3. Select New Design.
4. Under Shapes, drag the Add Star block onto your stage.
5. Hit the Play button to see the result.
6. Toggle the properties arrow and set the number of sides to 8. Hit Play to see this change.
7. Now shorten the Height to 3, change your perspective to view from the side, and hit Play.
8. Play with the Radius and Inner Radius Ratio properties to see how this changes your shape.
9. Let’s settle on a Radius of 150 and Inner Radius of 0.3.
10. Under Modify, select a Rotate block, then hit Play.
11. Under Modify, select Select All in Object and place between the Add Shape block and the Rotate block. Hit Play.
12. Right-Click on the Add Star block on your stage and select Duplicate. Attach under the Rotate block and hit Play.
13. Duplicate the second Add Star block and hit Play.
14. Change all 3 Rotate angles to 45 degrees and hit Play.
15. Duplicate the Add Star block a third time and hit Play.
16. That was the hard way. Now let’s try something easier. Delete all but the first 3 blocks.
17. Under Control, Drag a Repeat block around the 3 remaining blocks. Change Number of Repeats to 3 and then 4 and check your results.
18. Now change the angle to 15 and number of Repeats to 12 and check your result. You can play with the numbers to create something unique.
19. When you’re happy with your shape, rename your file “Revolved Stellar Explosion”.
20. In the upper, right-hand corner, click Export.
21. Choose the STL file extension, a format widely-accepted by 3D printers.
22. Choose a location and save your printable file.
23. Click the TinkerCAD icon to save your work.
This activity on using loops was inspired by the Autodesk activity: https://www.instructables.com/id/Using-Loops-in-Tinkercad-to-Design-a-Bursting-Star/
Published: January 2017


Developed by the Chandra X-ray Center, at the Smithsonian Astrophysical Observatory, in Cambridge, MA, with funding by NASA under contract NAS8-03060 | Privacy | Accessibility